

 I just survived a 6-month remodel of my kitchen, family room and master bathroom. Let me say that again: 6 months. 0 kitchens to use. 1 functional bathroom. 4 exhausted family members. If only I’d known what was coming on those endless days of noise and dust—and those few days without power or water that just felt endless. I wish our contractor had worked harder to let us know what to expect as the project crawled from start to finish.
This remodeling experience reminded me how important it is to set expectations, communicate clearly and follow through. That’s our goal at Xybix—once we earn your business and you select your consoles, the project begins in earnest. We’re here to guide you through the process from start to finish, working closely with you on everything from finish selections to elevator access at your site to the final walkthrough of a successful project.
My wife and I had great fun selecting materials for our remodel; we survived the process and the results are fabulous. What I want for you is to more than survive the process. I want you to enjoy the process because our consoles are the most comfortable and our designers are the best, offering fantastic layouts for communication. I hope this overview helps!
COMPLETING YOUR ORDER
Generally, when Xybix wins a contract, you’ve selected your consoles and “met and measured” with your salesperson. At this point, four easy steps remain to complete your order.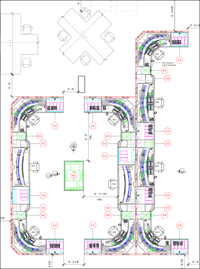
- Select Finishes. Work with your designer to finalize decisions about 3D laminate finishes, panel fabrics, acrylic barriers, colors and the like. If necessary, your designer can send samples.
- Select Cables. Work with your designer to select the correct model of video extension cables that work for your monitors.
- Sign Off on Renderings and Cable Sheet. Review the Final Renderings and Cable Sheet delivered from your designer via AdobeSign. Review and verify the room dimensions, workstation dimensions, colors, finishes and cables. After reviewing and verifying the details, sign and return the documents via AdobeSign. This is your signed order to proceed!
- Complete Purchase Order. Start working with your accounting department early to understand the Purchase Order (PO) or Signed Agreement process. (For example, you may need to add Xybix to your system as an approved vendor and obtain multiple signatures.) When you receive the final quote from Xybix, request the PO with a Purchase Order Requisition (if your company uses that process). Once you receive the PO, submit it to Xybix as directed.
MANUFACTURING & INSTALLATION PLANNING
With a PO in hand, Xybix dives into manufacturing while discussing site preparation, delivery and a final installation date with you.
- Hand Off of Project to Manufacturing & Vice President of Field Operations. Design and engineering perform a final quality check on your project and then manufacturing begins. Manufacturing generally takes about 10 weeks but varies depending on the size and complexity of your order. We’ll share an estimated completion date and keep you updated on the progress. At this point, the VP of Field Operations is your primary contact.
- Finalize Installation Date. No doubt your project timeline included a hoped-for installation date. Now that your project is in manufacturing, it’s time to work with the VP of Field Operations on a final installation date. You’ll need to confirm this date soon to prevent last-minute changes and costly change fees.
- Sign Delivery & Installation Agreement. The VP of Field Operations provides a Delivery & Installation Agreement, which details how to prepare the site, how the product is delivered and reasons for potential delays. As you’ll see, it’s important to complete any carpeting/flooring, painting, ceiling and electrical work before delivery. Plus, you’ll need to plan for site access and the teardown of any existing consoles. Sign and return this agreement within 10 business days of receipt.
- Complete Customer Profile. You’ll also receive a Customer Profile document to complete. Here, you’ll provide a final confirmation of all billing and shipping information, including the specific address and floor along with details on site access, delivery hours, loading dock, security, elevator usage and required safety gear. Also sign and return this document within 10 business days of receipt.
SITE PREP & INSTALLATION

You’re in the home stretch now. Even for a live cutover, your responsibility at this point is largely to confirm the site preparation and approve the final project.
- Prepare Site for Delivery. Before your order is delivered, be sure the site is ready for both the delivery process and the new consoles. Notify security that the delivery is coming, reserve the elevators, make sure the paint has dried and finalize all the other details to ensure a smooth delivery and installation process. If any last-minute changes occur, call the VP of Field Operations immediately.
- Sign Off on Final Installation. Your consoles are in! Now, walk through the completed installation with the Xybix professional installer and compare the completed project to the final drawings. If necessary, you will receive a Punch List of items to be completed, and then sign off on the project.
Whew!
That’s how I felt when the Massive Remodel of 2021 was complete, and I plan to enjoy my new space for the next 10 or 15 years. I hope our attention to detail at Xybix brings you the same joy as you settle into your new space.

